Monday, December 10, 2012

This Week's Ornament Tutorial : Patchwork Bird AND Pat Sloan's American Patchwork & Quilting Radio Show

(Wow! that was like, the longest blog post title in history, right?)


For the month of December, we will be doing a tutorial for an ornament every week. This week's ornament is a patchwork bird. It's an excellent way to make use of your scraps! If you have bags full of tiny pieces that you've been saving for someday- today is your day!

If you are short on time, there is also a plain version- you can sew up a "flock" of these in an afternoon.... You could also add lavender or a few drops of scented oil to your stuffing to make sachets. I've done "modern Christmas" colors of bright green, fuchsia  and turquoise- you can use whatever fabric scraps you have lying around (I know you've got some fabric there, somewhere... ha ha)

Supplies:
  • Scraps of fabric
  • Polyester filling/stuffing
  • 1/8" ribbon
  • Embroidery floss
  • For the eye: a tiny button, seed bead, or thread (such as embroidery thread or wool thread) to make a French knot
Print out and cut out pattern pieces (link at bottom of post).
To make the patchwork version, piece together scraps of fabric until you get a piece about 5 x 9” big.
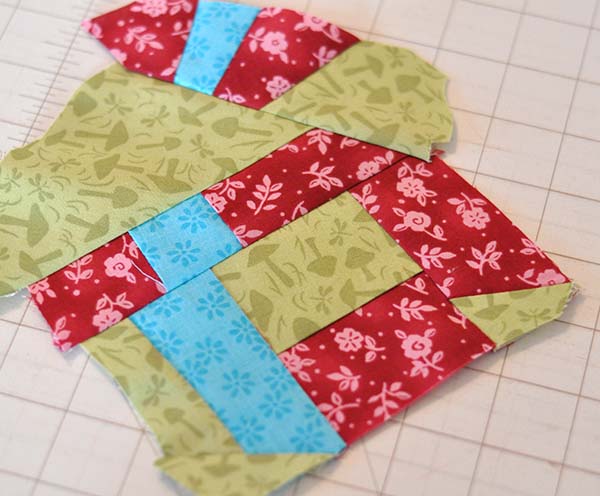


For the bird's body: For the patchwork version, place you patchwork piece right sides together with a plain piece of fabric. For the plain bird, place 2 pieces of fabric right sides together, pin pattern to fabric. Cut out around pattern. Remove pattern piece. Pin fabric pieces together.

Sew the pieces together (still right sides together) with a 1/4" seam allowance, leaving an opening as indicated on pattern piece. Backstitch at beginning and ending of stitching.


Hint for sewing around curves- shorten your stitch length, and as you go around the curves, go slowly and stop every few stitches to lift the foot just slightly and pivot the fabric slightly.

Clip seam allowance at points of tail and beak. Make a few small notches at the curves. This will eliminate some "bulk" of the fabric and make your seams flatter when you turn it right side out.


Turn bird right side out. You can use tweezers to help pull tight areas right side out. Use a wooden skewer to gently push out the points of tail and beak. Press (press the raw edges of the opening in.)


Loosely stuff bird with polyester filling. Use a wooden skewer to push filling into head and tail. Hint: stuff bird with many small pieces of filling, instead of a few large pieces.

Hand stitch opening closed with matching thread. 
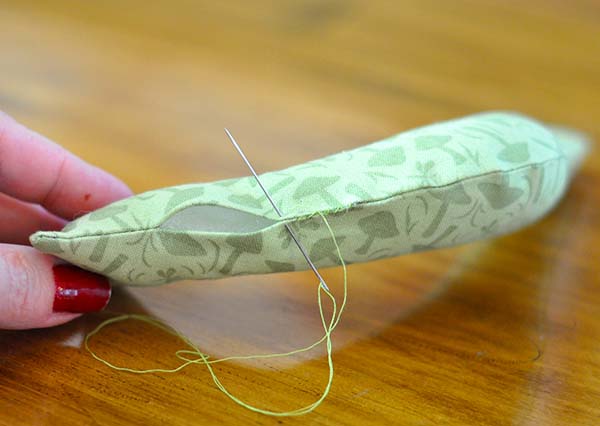

For wing, place 2 pieces of fabric right sides together, pin pattern to fabric and cut out. Remove pattern piece. Sew together (do not leave an opening.) Trim seam allowances.


Carefully cut a slit about 1 1/4" long into 1 side of the wing.
Turn right side out; press. Stitch opening closed and/or put a few drops of Fray Check on the raw edges. 


Use embroidery floss to stitch around edges of wing- you can do a blanket stitch, whip stitch, or make an X stitch. To make the X stitch, bring up needle through A, bring it around to the back, then bring it up through B (to the right of A). Continue making X’s.


Use matching thread to stitch wing to bird (you don’t have to stitch down the whole wing, just the top.) 


For the eye, sew on a tiny button, seed bead, or make a French knot.

Tie a bow around the neck with 1/8" wide ribbon.

Use a sewing needle to attach a 12" piece of embroidery thread to top of bird; knot to form a loop for hanging. 

  
(Here is the link to last week's ornament, Glittered Forest Friends, in case you missed it.)


What colors would you make your birds in? I think this would be a really cute project any time of year, not just during the holidays.

Oh! and don't forget I will be on Pat Sloan's American Patchwork & Quilting Show later today! I am excited, and pretty nervous- I hope I don't say anything stupid, you know??? I mean, it's one thing to say something stupid to the bank teller or the store clerk, but with so many people listening on the interwebs..... it's a bit nerve wracking!


Friday, December 7, 2012

Merry Moss: A DIY Christmas Decoration

Guest blogger Samantha has come up with an easy project for your home! I love this idea, it will add "rustic elegance" to your home. At the end of the post, I will have an announcement...


Happy December!
While I am sad to leave Fall behind, I am looking forward to the Christmas season.  It's my first Christmas as a married person (!!!!) so it's extra special for me this year.  To get myself into the spirit, I've been listening to Christmas music, doing lots of baking, and of course, making decorations!
My first decoration is actually something I've been wanting to make for a while as a permanent "non-holiday" decor item.  But once I had the Christmas music on, I was like, "Aw yeah, Christmas. Here we go."
Want to make your own? It's surprisingly simple and endlessly customizable!

Here's what you'll need:
wire, about 18 gauge (it needs to be easily bendable, but hold its shape when you add the moss)
fake moss (available in floral department of craft store)
clear fishing line
needle nose pliers

1. Form the wire into whatever word you would like it to say.  If you get it perfect, it might help to take a picture for yourself to refer back to, since you'll be bending the wire a little bit to attach the moss.
2. Cut a piece of fishing line about 18" long and tie it to the end of the word wire with a square knot. Take your first, small piece of moss and hold it against the wire. Carefully begin wrapping the wire around the moss in a spiral motion to hold it to the wire.  It should look like this:


3. Continue adding on more pieces of moss to be wrapped to the wire until your fishing line runs out.  Give yourself a little bit of extra line so that you can tie it off.  Once you have tied and clipped the fishing line, tie on another piece and continue wrapping the moss to the wire until the whole word is covered.

As I said, you could make this moss word say anything; "Christmas," "joy," "welcome," or even the name of your family.


I hope this project has gotten your holiday gears in motion, and that this rustic and whimsical decoration brings warmth into your home!

Happy weekend!
Samantha

So here is my (Jacquelynne's) announcement- in case you haven't heard yet, I will be on Pat Sloan's American Patchwork & Quilting radio show this coming Monday, December 10! Please join me- I'm sure it's going to be a lot of fun! (Can you from all of my !!!!! that I'm excited???!!!) Please tune in and tell all of your quilt-y, craft-y, sew-y friends about it.....


This weekend we are going Christmas caroling, and I'm going to try to finish putting all of my decorations up. And then, maybe some much needed down time and relaxation on Sunday afternoon. What's going on with you this weekend? Holiday decorating? Baking Christmas cookies? Maybe just catching up on laundry and other domestic necessities?? Remember to take time to do something fun....

Wednesday, December 5, 2012

This Week's Ornament Tutorial: Glittered Forest Friends


I do love my glitter. I love hedgehogs. So when I was trying to think up some ideas for ornaments, of course Glittered Hedgehogs came to mind. Why not? And I didn't want Hedgehog to be lonely, so I made him an Owl friend....

The trickiest part of this project is trying not to lose your glitter by handling too much... Handle the cardstock pieces as little as possible, and always on the edges.


Supplies:

  • White cardstock
  • 2 pieces of wood, 1/8 - 1/4" thick (such as Balsa wood), cut to 3 1/2 x 4" (for mine, I actually used some scraps of beadboard that my husband had laying on his workbench)
  • Acrylic paint in Brown (Americana Burnt Umber) and Light Green (Delta Ceramcoat Leaf Green)
  • Glitter- Brown and Light Green (Martha Stewart Brownstone and Green Agate)
  • ModPodge decopauge glue for paper
  • Scrap paper
  • X-acto knife and/or sharp small scissors
  • Small old paintbrush for applying ModPodge
  • 1/8 - 3/8" drill bit
  • #240 sandpaper
  • String or cord for hanging
  • Optional: 1/8" hole punch

Print out pattern sheet. 
Use an X-acto knife and/or manicure scissors to cut out the details in the owl. Once the details are cut out, use scissors to cut around the outside of the owl shape. 


For the hedgehog, you can either use the manicure scissors to cut out the eye and then cut around the outside of the hedgehog shape, OR cut out the hedgehog first and then use a 1/8” hole punch to cut out the eye.


Place one of the shapes on a piece of scrap paper. Use the paint brush to apply ModPodge to the shape (Hint- on the shape that will get dark brown glitter, apply glue to the printed side of the cardstock. For the shape that will get light green glitter, apply glue to the unprinted side of the cardstock. This will give you better coverage.) 


Quickly and carefully (before ModPodge dries), transfer shape to a clean sheet of scrap paper. Sprinkle (dump) a generous amount of glitter onto the shape. 


Wait several minutes to give ModPodge a chance to dry, then gently tap excess glitter from shape. Use the paint brush to reapply ModPodge to any spots that you missed and sprinkle with glitter. Allow to dry. (Don't forget to do the little circles for the owl's eyes).

Drill a hole in each piece of wood (for one piece, drill on the short side of the rectangle, and for the other drill on the long side.) The size of the hole needed will be determined by the size of the string or cord you are using to hang it. Sand the wood lightly.

Paint one wood piece green, and the other brown. (Don't forget to paint the sides and back.) Allow to dry, then lightly sand away some of the paint just on the edges. Remember that your brown glittered cardstock will go on the green wood, and the green glittered cardstock will go on the brown wood, so paint the pieces accordingly.


Holding the edges of the cardstock shape carefully, use a paint brush to apply ModPodge to back of cardstock (you will have to work quickly, because ModPodge dries quickly). Place cardstock on wood piece. Use brush handle to gently press edges down (this will work better than using your hands to push edges down- the handle won't remove glitter like your fingers will.) To place the owl's eyes, you may want to use tweezers. Or just drop it on and hope it goes in the right place, like I did :)


When glue is completely dry, you can use a small paint brush dipped in paint to touch up around edges and cover any glue or glitter smudges.


Allow to dry completely. Attach string for hanging.


You can also skip drilling the hole, and use them for little pieces of artwork. They look cute on a miniature easel: 


Click here for PDF of tutorial (including pattern sheet).

Monday, December 3, 2012

Newsletter LUV & Visit to the Christmas Tree Farm


Thank you for all of your suggestions! While the intention of my post was not to elicit compliments, you all warmed my heart and showed me some LUV! I am overwhelmed by your kindness and truly appreciate your nice comments and encouragement- we spend a lot of time making the newsletter the best that we possibly can, and it's nice to know that people like it... I have really enjoyed reading over all of your comments and suggestions, and over the next several months I am sure that we will be implementing many of them. (By the way, if you haven't entered the giveaway yet, you have until Tuesday at 11:59 pm EST. Click here for details.)

And by "we," I mean my whole family works on the newsletter in some capacity. I develop recipes & projects, write the instructions and the rest of the "copy," and do the illustrations and artwork that we use to "decorate" the newsletter. My husband handles all of the technical stuff- laying out content, scheduling, following up on statistics, etc. My oldest daughter, Samantha, who is also a guest blogger here every Friday, does the beautiful color celebration collages for every issue and also helps develop recipes and projects. My youngest daughter, who is 17, does some graphic work in PhotoShop and also helps with the recipes. So you see, it takes a village to write a newsletter! My many, many thanks to them for helping out with "Mom's project."

On Saturday, we went to the Christmas tree farm that we go to every year. The weather was warm- a little too warm for Christmas time activities, if you ask me- but we were happy that daughter Samantha and son-in-law Jeff were able to go with us. We chose our tree, and Sam and Jeff picked out their very first tree together.

When you get to the farm, you climb on a wagon pulled by a tractor. They drive you out to the middle of the farm and drop you off. It smells so good and pine-y! Then, you start looking for your perfect tree....

 (My 2 favorite girls in the world....)


(Jeff and Sam look for their first tree....)


When you find your tree, one of the workers cuts it down for you (they don't trust the general public with chain saws.... gee I can't imagine why....)


Then they put your initials on the bottom of the tree, and throw it on the wagon for you, and you get back on the wagon and ride back up with your tree...
(Someone had a nice suggestion for Sam and Jeff, that they cut the bottom off their tree when they get home, put a hole in the wooden disc with their initials, and have an ornament from their first tree forever...)

They put the tree in a bundler. It goes in like this:

And then it comes out like this:

All bundled up and ready to go on top of your car.

While you are waiting for them to bundle your tree, you pay for it and have complimentary coffee, hot cocoa and cookies.

When I was a kid, we always had a fake tree, and I never visited a tree farm until about 10 years ago- now it is one of our favorite family traditions.... I can't imagine a Christmas without it.

What's your favorite holiday family tradition?

Friday, November 30, 2012

Dark Chocolate Cranberry Bars, aka the Perfect Christmas Dessert


Before we get started in the kitchen (chocolate = happy dance) I wanted to remind you about our giveaway going on right now- there are 2 great prizes (retail value $75.00 each)... Click here to enter. Thanks to everyone who has commented so far and given me some great suggestions about the Newsletter!


Plus, my buddy Pat Sloan is also having a Holiday Giveaway Extravaganza! Click here for details on that one.... I will be on Pat's radio show on December 10 and I'm so looking forward to it. I hope you will tune it, because it's going to be fun!

Finally, be sure to check out the Give, Paint, Color! Charity Event hosted my friend Brenda Pinnick! This fun class will be held on December 6, the proceeds benefit Toys for Tots, and there will be giveaways too! It's sure to be an enjoyable and enriching time- Brenda is a wonderful artist... Click here for details.


Now.... hold onto your girdles.... Guest blogger Samantha has been in the kitchen making Dark Chocolate Cranberry Bars...

Let the holiday baking commence! 
Knowing my family, it is no surprise that once we sat down to Thanksgiving dinner, whilst stuffing ourselves with turkey and potatoes we began to discuss what we would be making and eating for Christmas. We are always one meal ahead!  I love the holiday season, as many do, because of the baking opportunities.  And when I think Christmas, I think cranberries... yum...


A couple months back I found this recipe of white chocolate bliss bars, just like the ones that Starbucks make.  She had me at Starbucks.  I tried the recipe out and thought it was great... except I am not a huge white chocolate fan... and as I was eating them I couldn't help but think, "Wouldn't it be great if these were chocolate?"


And so here we are.  Because once I start thinking about cranberries and dark chocolate, there is not stopping me.  Hold onto your hats, because I will be in a dessert frenzy until I get my cranberries and dark chocolate.
That being said, these are the perfect treat to bring to a Christmas party.  The chocolate is dark and serious, while the cranberries bring in that bright sweetness every once in a while to change the pace.  I am kind of in love with them.  Don't tell my husband!

Here's what you'll need...
For the Bars:
1 stick unsalted butter, melted
1 large egg
1 cup light brown sugar, packed
1/4 cup cocoa powder
1/4 cup milk
1/2 cup all-purpose flour
1/4 teaspoon salt, optional and to taste
3/4 cup dark chocolate chips
1/2 cup dried cranberries, loosely packed
To Make the Bars :
 Preheat oven to 350F. Line a pie pan with aluminum foil, spray with cooking spray; set aside. In a medium sized bowl, stir to combine the butter, egg, brown sugar, and cocoa powder. Add the milk, flour, salt, and stir until just combined, taking care not to over-mix or the bars will be tough. Fold in dark chocolate chips and cranberries and stir to combine. Scoop batter into prepared pan, smoothing it lightly with a spatula or offset knife if necessary.
Bake for about 20 minutes, and center is set, edges begin to slightly pull away from sides of pan, or a toothpick comes out clean; do not overbake. Let cool in the pan for a couple minutes, then carefully life aluminum foil out of the pie dish, and peel away from the sides of the bars. Allow bars to cool completely before frosting them. While they cool, make the frosting.

For the Frosting and Topping:
3/4 cup dark chocolate, melted
4 ounces cream cheese, softened (whipped or light may be used)
2 tbsp milk
1 ½ cup confectioners' sugar
1/4 cup dried cranberries, loosely packed (optionally, roughly dice them if the pieces are larger)
¼ cup dark chocolate chips
 In a small microwave-safe bowl, melt the dark chocolate on high power, about 1 minute, reheating in 10-second intervals, or until it can be stirred smooth; use a double boiler if that's easier.
Combine cream cheese, melted dark chocolate, milk, and confectioners' sugar, and beat until smooth and fluffy. Start by mixing on low speed so sugar doesn't spray, and then beat on medium-high for about 3 minutes. Mixture will seem stiff at first but will loosen and fluff up to a smooth velvety texture; stop and scrape down the sides of the bowl as necessary. Frost the bars; if you have excess, it will keep in an airtight container in the refrigerator for at least 1 month.
Evenly sprinkle cranberries and dark chocolate chips over the top of the frosted bars. Allow bars to set up for at least 30 minutes before slicing and serving. Bars may be stored in an airtight container in the refrigerator for up to 1 week.


Do you have any baking secrets you use for the holidays?  Any "secret weapon" recipes? Share them in the comments!

Happy Weekend!
Samantha

Tuesday, November 27, 2012

Your Suggestions, Please! & A Giveaway, Too!


Hey there, everyone! I am in need of your help! I am incredibly fortunate & blessed to be able to spend my days in my studio and kitchen, dreaming up new creations and projects. Putting together the newsletter is another thing that I really enjoy doing- it allows me to "play" in lots of different mediums and then share it all with you, my lovely readers! I do truly appreciate that you take the time to read what I've written in my blog and newsletter. That being said- I'd like to make the blog and newsletter even better! I would love your feedback. We are planning on rolling out some changes in the next several months to make both the blog and the newsletter more attractive and easy to utilize.  (But the Newsletter will remain FREE, published about 7 times per year. If you are not already a subscriber but would like to be, you can sign up here.)

(If you would like to see previous issues, click here to go to the Newsletter archives.)

Right now the Newsletter features recipes, simple craft projects and decorating ideas, etc.

  • Is there anything else you'd like to see? Other topics you'd like to see covered?
  • What do you like most about the Newsletter?
  • Is there anything you wish we'd just rid of?  (Please be honest- if there is something you dislike or find distracting, we would like to know...)
  • Should it be longer? shorter?
  • More photos? Less photos?
  • Do you have suggestions for changing the format?

******Also, right now the entire newsletter lands directly in your inbox- would you be opposed to having to click over to your browser (i.e. the interwebs) to view the newsletter? By placing the newsletter in a magazine format on the internet, it would be more attractive and easier to read, but would require you to click away from the email- would this discourage you from reading it? (This is a very important question- your feedback will determine the new format we choose for the newsletter.)

Oh, and I'm so tired of saying "Newsletter" over and over- so boring! I would love some suggestions for a new name. Something catchy, or homey & comforting, or relating to creativity....

So in order to entice you to respond (and not very subtly, either!) I am hosting a Giveaway...
Leave a comment here with your suggestions, or email me your suggestions (subject line: Suggestions Giveaway). There will be 2 winners- one will be my favorite suggestion, and the other will be randomly chosen from all comments and emails, so everyone will have a chance. If you have any suggestion- even if it seems small or you don't think it's great- please let me know! You never know where the best ideas will come from! (I've been referring mostly to the Newsletter, but I would also love your suggestions regarding my blog- content, layout, colors, frequency of posts, etc.)

Please comment or email by Tuesday December 4, 2012 (11:59 pm EST) to be entered in the Giveaway. (Of course, after that deadline, I would still be most interested in your feedback- any time...)

Oh wait! I almost forgot! Each prize will include:


These are fabulous prizes- the retail value on each prize is $75.00. Wow!


Thank you in advance for taking the time to give me your ideas and suggestions- it is truly, truly appreciated (big hug here)!

So........ since we are talking about the Newsletter, here is a preview of what's in store for the December issue, which will go out at the beginning of next week. (The subscription is free- you can sign up in the upper right bar of this blog. By signing up, you will only get the newsletter approximately every other month, no other emails from me- unless something incredible happens that I have to share, like if Brad Pitt and George Clooney are both my houseguests for the weekend, I will probably let you know... otherwise, I won't clutter up your inbox....)

December's Newsletter will feature:

Our family recipe for Chocolate Crinkle Cookies

Free Printable Holly-day Tags

Instructions to make your own (inexpensive) Sparkly Tree Forest

Holiday Kitty & Friends Pattern

We celebrate festive RED....

Recipe for Apple Hazelnut Gorgonzola Mini Tarts
(a scrumptious appetizer for your holiday get togethers.....)

PLUS: Details about our upcoming sale....

Thanks for your participation and good luck on the Giveaway!!!
(Feel free to pass this on to your friends via email, Facebook, Twitter, etc. 
I would love lots & lots of feedback... Thank you.)

Friday, November 23, 2012

Things I Love: Black Friday Edition

Guest blogger Samantha has some lovely holiday gift ideas for you! I have my eye on a few of them....


Well, I guess you could say it's official... It's the day after Thanksgiving, and therefore, it's CHRISTMAS TIME!  I usually try to hold off on decorations, music, and everything until the first week of December, but when it comes to shopping, I need to get it all out of the way ASAP.  So you know I've been scouting my Black Friday favorites for a while now.  Now, I will not be one of the crazies getting out there at 3 AM (will you? Good luck....), but I will be taking advantage of Cyber Monday, the online version of Black Friday.  Here are some of my favorite gifts this year for the special people in your life...

1. Your Mom: Mom will love this very cool herb planter for inside her kitchen.  No more going outside or having to buy herbs in the cold months, and she can label whatever she has growing on the chalkboard frame!  The planter is available at Williams-Sonoma for $129.95.

2. Your Younger Sister: I asked my sister what she wanted for Christmas this year, and she very simply told me, "Tea."  This collection comes in a bunch of different flavors, all with fun names! I particularly like, "Just Chai Me" and "S'oolong Lazy."  The best part, though, is that the labels are pretty colors that can be displayed all year round, even when the tea is long gone!  You can get this tea collection at the KitchenStories shop on Etsy for $16.00.

3. Your Niece or Daughter:  This may sound strange, but children's clothing is my favorite.  I wish they made them in big people sizes.  Especially this dress.  It is so cute.  I can picture it with pink tights and ballet flats, or leggings and boots.  Whatever little girl you have in your life, she is sure to love it.  Just don't buy yourself a matching dress, much as you want to.  You can find this dress at H&M for $24.95.

4. Your Cat:  Even the pets need little something this holiday season, and I know for a fact that my cat would love this little tent.  You can order it from ModCloth for $24.99.

5. Your Dad or Husband:  My husband is a pretty big music enthusiast, so he pulls me into a record store whenever possible.  In case you haven't heard, vinyl is coming back! So break out all those old records you have stashed away, and transfer them to your computer with this USB compatible record player.  This is such a cool gadget that any guy will appreciate, even if he doesn't have a record collection yet!  You can pick this up at Best Buy for $99.98.

6. Your Best Friend: Nan Lawson is one of my favorite artists of the moment.  She does some really sweet pop culture illustrations as well as inspiring words, like this print here.  I always want to build up my girlfriends, so I can't think of a better gift than something that is pretty AND uplifting! You can order an 8 x 10" print from Nan's Etsy shop for $16.00

What do you have in mind for your loved ones this year? Are you braving the Black Friday insanity, or are you sleeping off yesterday's Turkey Coma?  Whatever you do, enjoy!

Happy (Late) Thanksgiving, and happy weekend!
Samantha

Tuesday, November 20, 2012

Throwback Post: Giving Thanks


I have been sitting here trying to figure out what to say about Thanksgiving that hasn't been said a hundred or a thousand times already.... I was going through some of my old posts and found this one from 2008- it seemed to fit perfectly how I am feeling this week....

You turned my wailing into dancing;
You removed my sackcloth and clothed me with joy,

that my heart may sing to You and not be silent.
O LORD my God, I will give You thanks forever.
Psalm 30:11,12


It seems a shame to me that we set aside only one day a year to focus on thanks and gratitude. I know that I need to be thankful more often, it sometimes seems that days go by without me whispering even a few words of gratitude to God. I just get so caught up in the day to day stuff of life, that I forget how blessed I really am....

For God's unwavering and fierce love for me....

For an imperfect yet completely wonderful family....

For friends who would drop anything and everything to come to my rescue, if need be....

For the opportunity to live in a country where I can say what I want (even if I'm wrong), where I can worship Whomever and however I want, where I have a say in our government.... I don't think that here in America we really realize how remarkable that is.... The freedoms we have can only be truly appreciated if we go to other countries and experience the fear and control that people live under on a daily basis....

For never being in need of food, clothing, shelter....

And for the OPPORTUNITY to help others out of my blessed abundance and gracious plenty...
From everyone who has been given much, much will be demanded; and from the one who has been entrusted with much, much more will be asked. Luke 12:48

As Americans, we live in the wealthiest and most prosperous country in the history of the world...

Sometimes, I think about the silly things that I allow myself to get upset over.... But still, sometimes things just hurt.... disappointments in life, loved ones letting us down or hurting our feelings.... not tragedies, but still painful. Sometimes I think that I have no right to ever get upset about things, because there are people in our world who deal with tragedy on a daily basis... who will never know peace... who will never know how it feels to not go without, even for one day.... 

But I realize that God, while His heart breaks for these tragedies, feels my pain too. He knows. He knows my disappointment, my hopelessness and helplessness at times. He knows that life is oftentimes painful, for all of us. And as our Father, He understands.

Are not five sparrows sold for two pennies? Yet not one of them is forgotten by God. Indeed, the very hairs of your head are all numbered. Don't be afraid; you are worth more than many sparrows. Luke 12:6,7

I know everyone is so busy this time of year. Personally, I like the busyness- for me it is fun, joyous- shopping, decorating, singing along to my favorite carols. But the busyness sometimes makes it easy for me to forget just how much I have to be thankful for.

I would ask that everyone take just 10 minutes and visit one of the sites listed below. See the work that God is doing, through the hands of His servants here on earth. Please take time to be thankful for what we have, and for people who are willing to help others even on the far edges of our world (and in our own towns). Please pray for these organizations, for their workers, and for those who contribute monetarily to them to make the work possible. Maybe you will be moved to make a donation to one of these worthy organizations, to help them continue their work.

World Vision


Therefore, since we are receiving a kingdom that cannot be shaken, let us be thankful, and so worship God acceptably with reverence and awe. Hebrews 12:28 


Happy Thanksgiving!


P.S. In addition to Thanksgiving preparations, Samantha (my daughter and guest blogger extraordinaire) and I have been busy working on the December Newsletter. In a few months there will be some exciting changes to the newsletter! It will still be free and full of recipes and projects, and we will continue to publish it about 7 times per year. If you would like to subscribe [yes, it's FREE :)], you can do so at the upper right bar of this blog.


LinkWithin

Related Posts with Thumbnails