Showing posts with label Creativity. Show all posts

Thursday, March 21, 2013

Fabric Design Process

Last week I spoke at the Berry Basket Quilter's Guild in Medford, NJ. I met a lovely group of ladies and talked about my wool pins and my fabric design process. (Don't I have a weird look on my face in this picture??)


I also debuted my new book, Child's Play, and showed some samples from the book:


May is rapidly approaching- that means it's almost time for International Quilt Market in Portland, Oregon. I will have a new fabric line debuting at that show. I feel like I have been working on it forever.... This particular line has had many revisions. Sometimes a fabric line will come about quite easily, and other times it seems it takes a million tweaks to get it right.

I wanted to show you a little glimpse into how a fabric design might come about. This is a page from the Better Homes and Gardens June 2012 issue. I liked the pattern in the wall paper, with the alternating circular and diamond shaped motifs, and I thought an idea like this would work well with the line I was working on.

The description in the magazine says that the decorator was influenced by Indian prints. Indian prints are often done with a carved wooden block, which is stamped onto fabric or other surfaces. You can see that the circular motif in the wall paper has 8 "petals" and the center is a circle. Using that for inspiration, I drew a circular design that had 8 petals, but I had a different idea for the center:


 I also drew a square which I could rotate into a diamond shape:

The palette for this line has a lot of blues, so I painted my motifs in a pretty turquoise color. Also, I couldn't get a close look at the details in the wall paper so my design ended up being quite a bit different from the original. The original also had some extra "fan shapes" in the circular motif which I did not include. (Even if I did have a detailed look at the original, I wouldn't copy it- I look at something to inspire me and then do my own thing.)

Then it was time to start laying things out in a repeat in PhotoShop to see what would happen....


(I also had some versions with the circles rotated a bit, but apparently I didn't save those...)

I took the center of the circle:


and repeated it to make a border:


In the end, we ended up not using the circle & diamond repeat, but we did use the border and the individual circle and square motifs that I originally painted. When we get closer to Quilt Market, I will  show you some of the patterns that DID actually make it into the line!

So that is a little bit about the evolution of just one pattern in a fabric line.... And then you figure that there are anywhere from 5-8 patterns in a line... a lot of stuff that you like doesn't make the final cut because it just doesn't work with the rest of the line. It takes a lot of hours... (if I ever actually kept track of how many hours I spend putting a line together, I would probably shock myself!)


Monday, March 18, 2013

Child's Play Book is here!

Well, it's only 3 1/2 weeks behind schedule, but it's finally done (big, big grin!)


I am excited about this book for a bunch of different reasons...  The first reason is that this is the first book that I've self-published. (Actually, at first it was just going to be a quilt pattern... but then I started adding more and more ideas until it turned into a 55 page book with about 8 projects and 3 recipes... but that is just like me: I have said it before and I'll say it again, I am definitely a "more is more" kind of girl!)


When you do a book with a publisher, it takes a very long time- a minimum of a year. I was able to put this together and get it published in about 4 or 5 months' time. In working with a publisher there is also a loss of a certain amount of creative control, and depending on the publisher this can be a lot or a little. (When I worked with Kansas City Star for my first book, they were actually really great about including most of the projects that I wanted to do, etc.)

For Child's Play, I designed & made all of the projects & recipes, laid out the book, provided the artwork & illustrations, did the photography... being a "control-freak," it was appealing to me to be able to have everything exactly the way I wanted it (I have a bit of a rebellious streak and sometimes don't like collaboration... I just want to do things my own way...)

It was a lot of work, and a really huge learning curve for me as far as the technical aspects... Many, many times, through tears of frustration, I wondered what I had gotten myself into and swore that I would never do it again. But then I finally got my copy and held it in my hands and it looked so great and I was so proud of it... and I immediately knew that Yes, I will definitely do it again.... hopefully next time I will have figured a lot of it out and it will be a much easier process!


Another thing that I am super-duper-excited about with this book is that I have ventured into the world of video... talk about a learning curve! I had never made a video in my life, but after some trial and error I think the videos came out fairly decent (again, now that I know a little more I think the next ones will be easier for me to do and come out better.) I did 3 videos to go with the book, and with the digital version (which I'll talk about a little later), you can click right on the link and it will take you to the YouTube video. So, for example, if you are making the stuffed animals and would like some tips on how to turn and stuff those skinny tubes for the arms and legs, just click the link and watch my video! Really convenient, don't you think? (If you buy the printed version, you will also have access to the videos, you will just have to type the provided address into your browser instead of just clicking.)


The book is available in both a print copy and a digital copy. I love books- I have many, many in my collection. Isn't it fun to just sit and look at the pretty pictures while enjoying your cup of tea or coffee?


I wanted this book to be very affordable- at only $15.00 for a 55 page, full color book with 8 projects, 3 recipes, and several kid's activity pages, this is a fabulous value! 

To order your printed version of the book, click here. This will take you to an outside but fully secure website. I looked into several options for printing the book, and decided on this site for several reasons. First, I could keep the price to a minimum. Second, I do not have to warehouse and ship the books myself. This is huge because right now for my other products, I do all of the order processing and shipping myself, and I am finding it harder and harder to keep up with orders. This website ships the book directly from the printer to the customer. And as I said earlier, the quality of the printed book is beautiful.

Now, you also have an option to buy a digital copy of the book. To buy your digital book (e-book), click here. There are many advantages to the digital book also! 
  • First, the price- only $12.00 for all of the full-color content you get in the printed book. That's a lot of content for $12.00- really a great bargain!
  • You don't have to wait for the book to be shipped- you should have your link for your book within 24 hours of your order, which means you can start creating right away!
  • Especially important to international customers: No Shipping Costs!!!
  • You can view it as a "flippable" book (like my newsletter), or you can download the PDF onto your computer or device to read at any time.
  • It looks beautiful on the iPad!
  • Links are easy to use- just click. There are links to the videos as mentioned above, and also to my social media sites such as Facebook, Twitter, Instagram, and Pinterest.
  • Print out just the pages you need- maybe a recipe or a pattern page or the kids' activity sheets. So much easier to have a single recipe page in the kitchen to work with than a whole book, right? And you don't have to worry about splatters on your book!
  • Never trace a pattern again- just print it out onto inexpensive computer paper and cut the pieces out.
  • For those concerned about using up a lot of expensive color ink, you can save ink when you print pages by choosing "grayscale" in your printer options and printing in black and white.


To see more sample pages, click here. (The quality of the sample pages is greatly decreased- the quality of the actual digital & printed books is much better.)

So, just to re-cap, here is what you get for the price of $12.00 for the digital book or $15.00 for the printed book:

  • 2 quilt patterns (2 colorways each)
  • tote bag pattern
  • patterns for 3 stuffed animals with clothes
  • 2 embroidered wall art projects
  • 3 kids' activity sheets and 2 crafts
  • 3 kid-friendly recipes (easy for the kids to help make, fun & tasty)
(And even though the name of the book is Child's Play, the tote bag and Skip to My Lou Quilt would be great in your favorite "grown-up" fabrics! And the recipe for Sloppy Joe Egg Rolls is a great appetizer for any party. Why should the kids have all the fun?)

I hope you will enjoy this book as much as I enjoyed putting it together. It was a real "labor of love"!
I look forward to your feedback- please tell me what you think!

Monday, January 14, 2013

New "Happy Town" Projects

Did you enjoy our "Throwback Posts" last week? I hope you did- I spent last week sewing, and sewing, and sewing some more.... and writing.... and taking photos (lots of photos!)..... I am putting together a pattern that I hope you will really like.... no, OK, I hope you LOVE it! I will be doing this one differently than I have in the past. One thing that will be different is that instead of drawing diagrams, I took photos for every step. And the format will be different from my previous patterns.... but that is all I'm saying for now. I hope to have it done by mid-February. Many of the projects feature my newest fabric line, Happy Town.

Here is a sneak peek:
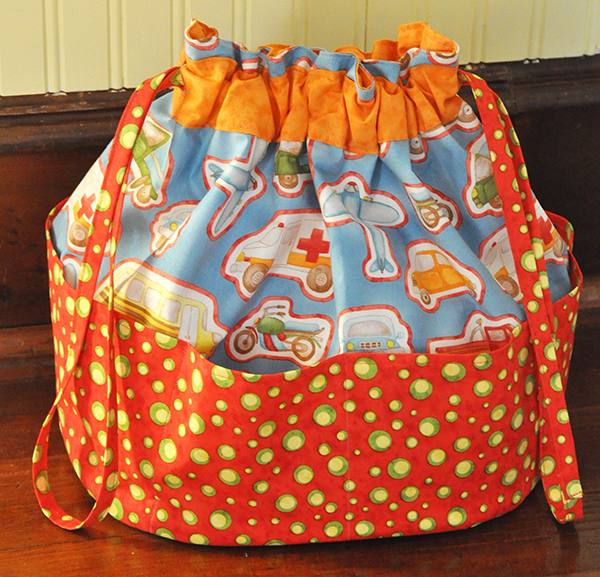
A great tote bag with lots of pockets (I don't know about you, but I love a tote with tons of pockets so I can keep my stuff organized.) This is great for kids because it's nice and roomy and they can put all of their little toys & treasures in the pockets (I am making one for myself in "grown-up" fabrics, because I think it will be great for the beach- pockets for suntan lotion, sunglasses, etc.)

Remember a couple of weeks ago I asked you to keep me accountable to finish that little stuffed kitty? Well I finished it, and she will be included in the pattern, too- and she will have a puppy dog and a bunny friend to keep her company!

There will be a couple of embroidery projects:

AND, there are TWO quilt patterns.... so this is going to be a nice-big-fat pattern. 

I am excited about this fabric line- I am donating all of my royalties for the line to Quilts for Kids. Also, Henry Glass Fabrics is sponsoring a quilt contest, with cash prizes AND the winning quilts will be displayed at Quilt Market in May. Click here for the rules. I can't wait to see all of the beautiful quilts that you make (I will be one of the judges- I am sure it's going to be hard to choose....) The great part is that all of the quilts sent in for the contest will be donated to Quilts for Kids- so please enter, and tell ALL of your quilt-y friends and guild members.

The fabric is due in shops by the end of this month. You can also pre-order it from Fat Quarter Shop, so you can have it delivered to your doorstep and get stitching right away.

So now, a couple of questions for you-
  • What features are most important to you in a pattern? What do you like or dislike in patterns that you purchase? Do you prefer paper or digital that you can download right away?
  • Do you participate in any kind of charity quilt programs or events? Do you make quilts on your own, or as part of a group?
  • Which is your favorite project shown above for my upcoming pattern?

OK sorry- that was more than a couple... I guess I'm feeling a bit "nosy" today!
Have a Marvelous Monday :)


Monday, December 24, 2012

This Week's Ornament Tutorial : Fabric Scrap Rosettes


So it's Christmas Eve and you think you don't have time to make an ornament? Wrong! These are pretty quick.... And it's a great scrap project- You know those long skinny scraps left over after you trim the excess backing from your quilt? Perfect! Fat quarters are also perfect for this project. (Oh, and Jelly Rolls will work too, even though they're 2 1/2" wide instead of 3"). You can even use up your scraps of fusible webbing.

If there's no time to make them for Christmas, you could make them in any fabrics and hang them in your window, or attach to gifts as an embellishment. Make Blue & White ones to mimic snowflakes for January, or try Red & Pink fabrics for adorable Valentine's Day decorating.

You will need:
Scraps of fabric
Fusible Webbing
Needle and Thread
Button
Glue
Thread or Cord for hanging

To make the ornament, cut 2 strips of fabric about 3 x 19".


Cut fusible webbing so that it is slightly smaller than fabric strip and fuse, according to manufacturer's directions, to WRONG SIDE of one fabric strip. (You can piece together scraps of the fusible webbing, as I did.)

Remove paper backing and fuse the other strip of fabric to the one with the fusible webbing, RIGHT SIDES OUT.

Trim the strip to 2 x 18".
Accordion fold the strip, pressing the creases with your fingers as you go. The creases will stay in the strip, so when the folded piece of fabric becomes too bulky to hold, you can release it and go on to the next section.


Run a needle and thread through all of the pleats except for the first and last ones. Pull thread so it is snug and tie the thread off.

Sew the edges together. Use matching thread (I used contrasting thread so you could see it better in the photo.)

Attach thread or cord to make a hanging loop.

To make the yo-yo for the center, cut a circle that is 4" in diameter. Make a running stitch all the way around, about 1/8" from the edge. (No need to turn the raw edge under, it will be hidden by the button.)

Pull thread to gather and tie off.

Sew a button to the yo-yo. Glue the yo-yo to the ornament.

If you would like a double-sided ornament, simply glue another yo-yo and button to the back.


Click here for PDF of this tutorial.


This is our third ornament tutorial for the month of December. If you would like to see previous tutorials, see below (click on title to see tutorial):


Patchwork Bird


Glittered Forest Friends


Wednesday, December 19, 2012

New York City: Get Inspired


A few weeks ago, I jumped on the train and met up with my friend and fellow Henry Glass Fabrics designer Brenda Pinnick in New York City. What a fun day we had! NYC is full of inspiration and creative stimulation, but never so much as during the holiday season. The word for the day was COLOR! I hope you will be inspired too- I took lots of photos. (I took all of the photos with my phone, some are better than others...)


Here are some Turkish bowls found at a street fair (I wanted them all). Look at the colors- cheerful without being too bright. And the green in the upper right corner looks a lot like the Pantone Color of the Year for 2013- Emerald. We are already seeing this all over the stores, especially in accessories like handbags. You will be seeing more of it in the upcoming year:


Here is Brenda, "loving" the bolts at Mood Fabrics (the same one visited by contestants on Project Runway). Even though I didn't buy anything (I recently cleaned out my sewing room, I'm not ready to fill it up again...) there was certainly no shortage of inspiration. So many colors, so many fabrics, so little time... Of course you don't have to visit the Big Apple to be inspired- stroll around your local quilt shop, favorite gift shop or boutique-y clothing stores for lots of "eye candy". Look for trends as far as colors and themes.


Something I discovered at ABC Carpet is the trend of patchwork and over-dyed carpets. All I can say is, "WOW!!"

Old carpets are cut up and pieced together. (See, those quilting & sewing skills come in handy everywhere!) Sometimes, as shown below, the carpets are over-dyed and the colors are deeply saturated. The effect is truly stunning. My iPhone photos don't do justice to these works of art :)
Has anyone seen this done before? It was new to me. We saw a lot of turquoise, fuchsia/raspberry, and yellow.


Sometimes, entire carpets are over-dyed. We were told that this vibrant turquoise is the most popular color right now:


Here, over-dyed carpet has been used to cover large ottomans. Love it!

More color inspiration- stacks & stacks of hand made quilts. I believe these were made in India (notice more bits of Emerald Green, and last year's Color of the Year, Tangerine):


All of that shopping made us hungry! Brazilian Chivito Steak sandwich, served with ham, a fried egg, and herb French fries. It was delicious. When I bit into it, the egg yolk ran all over and it was so good (incredibly messy, but good):


Someplace I have been wanting to visit for a long time is Eataly, an Italian Market owned by famous television chefs Mario Batali and Lidia Bastianich. Lots of inspiration here, too- to shop and cook and EAT. If you are ever in NYC, I recommend it, it's lots of fun just to walk around:


(Yes, that cheese IS $37.80 per pound- it must be really good...) 


The market is divided into sections: meat, fish, cheese, wine, etc. You can purchase food to take home, but there are also prepared foods that you can eat and enjoy there.


And finally, some NYC miscellany...
Giant Christmas tree at the train station:


And of course, a Miniature Pinscher wearing brand new shoes:


I hope you have enjoyed this "trip" to NYC with me!  There are lots of ways to charge your "creative batteries." It can be visiting a particular city, or a favorite shop. Or maybe the mountains or beach or hiking in the forest. Or maybe just sitting at Grandma's table eating her famous (fill in the blank)......

What is your favorite place to go to be inspired?

LinkWithin

Related Posts with Thumbnails