Showing posts with label Tips and suggestions. Show all posts

Wednesday, May 8, 2013

DIY Quick Broken Necklace Fix

Wow! What an incredible response we had to last week's blog hop, sponsored by Quiltmaker Magazine! The winner of the free issue, chosen at random, was Lea from Indiana! Her copy of Quiltmaker's 100 Blocks Volume 7 is on its way.

The new website and blog are almost done... please stick with me as we get it launched. I am hoping for next week... I'm not sure, but this may be the last post you see on this "old" blog!

In the meantime, I wanted to show you a really quick fix for costume jewelry chains. I always have fishing line in a couple of different weights in my craft cupboard. Because it's clear and very strong, I find it comes in handy for lots of stuff.... this week I found out that you can use it to fix jewelry!


My daughter had this inexpensive necklace that broke. And when I say inexpensive, I mean really cheap, like it cost just a few dollars at the accessory store at the mall. But she still liked it and wore it a lot.

The links were too small to try to fix with the pliers that I had at home. I removed the broken link. If you can't remove the broken link because it's too small, just leave it there. I took a piece of fine fishing line, several inches long, and threaded it into the 2 links.

I carefully tied it off, several times, being careful that the necklace chain stayed flat and didn't bunch up from pulling the fishing line too tight.

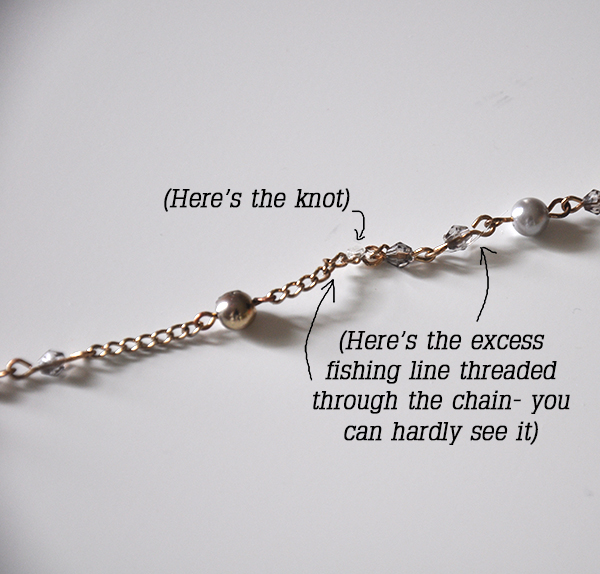
Then I threaded the fishing line up the necklace through several more of the links. You don't want to cut the fishing line off right at the knot because it may become untied later on.


After I had threaded both ends through the necklace chain, I cut off the excess fishing line.

You can't even see where the repair is!


Now obviously I don't recommend this fix for your good jewelry- but for cheap costume jewelry it really does the trick!

Monday, April 8, 2013

"Making Do" in the Kitchen: 101 Uses for Your Ice Cube Trays

{Okay, so it's really more like, 8 Uses for Your Ice Cube Trays... but still... I bet you will find an idea or two here that you hadn't thought of ....}

When we moved into our house about 10 1/2 years ago, we were lucky to find that the refrigerator/freezer that came with it had an automatic ice maker, so these guys got thrown to the back of a cabinet.


Fast forward all those years later... I pulled those trays out of the cabinet, ran them through the dishwasher (yeah, all those years in the back of the cabinet had left them pretty dusty), and started of thinking of all the things I could use them for, besides making ice cubes with standard H2O.

The little "compartment" of an ice cube tray will hold about 1 tablespoon. For all of these ideas, place the food in the tray, freeze, pop them out, then store in plastic bags in your freezer.

Don't you hate it when you need just a tablespoon of tomato paste, and then the rest of the can goes to waste before you get a chance to use it? Simply put the leftovers into cube trays & freeze. Now you can use a tablespoon or 2 of tomato paste whenever you need it, without worrying about how to use up what's leftover. (I have bought the tomato paste in a tube before, and while it's convenient when you need just a small amount, it's quite a bit more expensive than buying the cans when they are on sale.)


That bunch of cilantro in the above photo was hanging out in the fridge, too, with nowhere to go. I had bought a bunch of cilantro to make salsa, but only used about half of it. A great way to use up fresh herbs is to make a "pesto" (traditionally made with basil, but it's the same idea.) Put the herbs in a blender or food processor with a little water and/or oil and make a paste. Spoon into the trays and freeze. Voila- a freezer stocked with "fresh" herbs (which taste a whole lot better than the jars of dried herbs, anyway.)

Making a recipe which calls for egg whites or egg yolks only, and don't want to throw the rest out? Place the leftover whites or yolks in the trays and freeze. Each compartment in the ice cube tray will fit one yolk perfectly, or the white of a medium egg. I found that they didn't just pop right out of the tray, so I ran the bottom of the tray under a little warm water and used a knife to loosen the edges.

If milk or cream is about to turn, place in ice cube trays and freeze- then pop one into your morning coffee or tea. (You may want to fill the trays only about 1/3 - 1/2 full if you don't use a full tablespoon of milk or cream in your coffee.)

Here is a trick I picked up from Trader Joe's- I purchased their frozen mashed potatoes and found that the potatoes in the bag were frozen little squares or nuggets. Place your leftover mashed potatoes in ice cube trays to freeze, and then you can take out exactly as many portions as you need. Great for single servings!

Make juice cubes instead of regular ice cubes for your summer iced teas and cocktails- it will flavor rather than dilute your beverage as it melts. Try the same idea with leftover coffee and make cubes for your iced coffee.

Freeze leftover broth, stock, or wine and place a cube or two in sauces and gravies or other favorite recipes as they cook.

I'm sure there are many other things to use your ice cube trays for- Please share your ideas and tips with us in the comments!


Friday, March 1, 2013

New Studio Space!!


Do you want to see the studio space I have recently "acquired"??? I love it! And the funny thing is, I didn't know how much I "needed" it until I got it all done....


Our oldest daughter got married back in June. Sad as we were to see her go... youngest daughter couldn't wait to get her hands on her older sister's old (bigger) room! We moved youngest daughter into that room.... what to do with the extra room which used to be youngest daughter's room? Expand the studio space, of course! (No brainer, right??)

Now, I will tell you a secret- for years now, I have kept most of the quilts I have made in big plastic containers in the basement, because there really wasn't another place to put them. I couldn't wait to have a room dedicated to storing and displaying all of my quilts! And also, I wanted more space for storing my bolts of fabric and for cutting fabric.

We decorated the room when my daughter was about 8 years old. It had yellow bead board and lilac wall paper. My daughter tried to talk me into painting, but I just didn't have the energy for that! I decided that the colors worked fine with my stuff- it's cheerful. Here is a photo of what it looked like when I was organizing all of my quilts.


In addition to the yellow bead board and lilac wall paper, the room also already had shelving all around (for displaying dolls). This, I discovered, was PRIME real estate for storing and displaying fat quarter bundles which are waiting to be purchased & go to their new homes, as well as many of my project samples:


I already had many of the furniture pieces in the room. The dresser is a vintage piece from my grandmother- great for storing all kinds of stuff. I had the rug, and the cedar chest. The cedar chest used to belong to oldest daughter, but it's not her style and she left it behind when she moved out. It is perfect for storing all of my wool and protecting it from moths:


 The cabinet was youngest daughter's and stayed in the room when she moved across the hall to a room with a much bigger closet (making her little armoire unnecessary.) Now I have some place to store all of those quilts that used to hide in the basement:


I did buy a couple of pieces of furniture for the room from Ikea. My favorite is this gate-leg table. You can have one side of the table up, or both, or neither, so it's really convenient. There are drawers on both sides for more storage. Plus, I think it's just really cute. It works out really well when I have lots of fabric to cut (like when I'm assembling bundle after bundle of fat quarters...)


I also got some shelves from Ikea so I have a convenient place to store my bolts of fabric, and other cute stuff:


A bonus of this room, which I didn't even realize until we got it all done, is that with 3 east and south facing windows, the light is great! So it makes a perfect little photography studio. And since I have managed to keep it pretty neat and clean so far, it also means that I don't find myself spending half an hour to find a clear surface so I can set up a photo.


Did I mention that I love my new space? I spend as much time in there as I can, because it is so bright and cheerful and uncluttered (my "main" studio space tends to get pretty messy....) Also, since my main studio is downstairs and the "annex" is upstairs, it has really increased the amount of exercise I get each day :)

To go on a "tour" of my downstairs studio, click here.

When it comes to a sewing room, studio, or other "hobby" area, what is the most important feature to you? Lighting? Storage space? Your surroundings- colorful & energizing or peaceful & inspirational? Being as close to (or as far away...) from the family as possible??

Thanks for "visiting" my new studio!

Thursday, October 18, 2012

Easy Fall Decorating: Fancy Pumpkin

Guest blogger Samantha has a handy and inexpensive crafting supply to share with you today. What a modern twist on the ubiquitous pumpkin!


Some of you may already know this, but I'm about to let you into a little decorating secret.  You know what the most valuable you will ever have in your DIY arsenal is? Spray paint. Spray pain helped transform this room and this room, and now it's even helping me throw together some decorations for fall!  I snagged this adorable "spooky pumpkin" from my local produce market and turned it into a rustic yet modern centerpiece for the season!

Here's what you'll need:
pumpkin/ spray paint of your choosing/ painters tape


1. Wipe down your pumpkin with a damp cloth or paper towel.  Then begin taping your design onto your pumpkin.  Think about what kind of design you want to make and how much paint vs. how much pumpkin you want showing.  Make sure you secure all of the paint edges so that no paint gets underneath.


2. Start spraying!  Try to keep the paint can as far away from the pumpkin as you can, so that the spray covers the surface lightly, not coating too thick with drips.


3.  Let dry for an hour or two and then carefully peel off the tape.  Some of the edges of the paint may be loose, so press down on them with your fingers.  Then, put on display!


I love the way this shiny, modern pumpkin looks next to the little pumpkins and the berries!  There are so many ways to decorate your produce for fall; paint polka dots, stripes, or faces!  Let me know what you come up with!

Happy weekend (I know it's only Thursday, but I like to get a jump on my weekends!)
Samantha

PS Don't forget about Jillily's "Blook Tour" with prizes. Saturday is my turn to act as "hostess" for the tour, so stop by here for a chance to win a copy of Jill's newest book!


Tuesday, August 21, 2012

How to make a Quilted Potholder (i.e.: A Tutorial)


Today we are going to make a potholder! I will show you how to make this particular block, but you can use this method to make a potholder out of any of your favorite blocks (Hint- this is a great way to use up orphan blocks or test blocks that you may have laying around. Because seriously, do you really need another  pillow? Me neither....)

Click here for a PDF of this tutorial.

For this project, I used my fabric line Fruitful Hands (Henry Glass Fabrics). The fabric line will (not quite so coincidentally) be in quilt shops this month.

All seam allowances are 1/4". Here is what you will need:

  • 4 1/4" square of focal print (keep in mind that if it is directional, like mine, the square should be cut on the bias)
  • 1 - 3 7/8" square- green polka dot
  • 2 - 3 7/8" squares- orange
  • 4 - 3 1/8" squares- yellow
  • 2" wide by approximately 42" long strip of striped fabric for binding
  • 1 1/2" x 4" green polka dot (for loop)
  • 9" square backing fabric (I used the focal print)
  • 9" square insulated batting (from The Warm Company, see photo below)


Start by cutting the green square into quarters diagonally, then repeat with the orange squares:


Sew an orange triangle to each yellow square:


Then sew another orange triangle to the other side. Cut off those little "dog ears":


Sew 2 of these units to opposite sides of your focal print square:


Sew a green triangle to opposite sides of the remaining 2 yellow square units:


 Sew the large triangle units to opposite sides of the focal print unit to make a block (approximately 8 1/2"):


Layer the backing (right side down), the batting, and the block together:


Your backing and batting will be slightly larger than the block. Pin or spray baste layers together.
Quilt as desired. I just "stitched in the ditch", in other words, right along the seam lines. Trim away excess batting and backing:


To make the loop, press the piece of fabric in half lengthwise, then open up and press the raw edges toward the center fold (right sides out):


Fold in half lengthwise again and top stitch along edge:


Fold in half and sew to top edge of front of potholder (I forgot to take a photo before I started sewing on the binding, so you can see the binding there. Just ignore that for now. Just sew that loop on. So sorry...)


Now we are going to talk about the binding. Fold the strip in half lengthwise with right sides out and press. Fold in one of the short ends diagonally and press:


Pin binding to one edge of potholder and sew as shown below:


Fold the strip up:


Then fold it down, like this, and pin. Stitch along edge, starting and stopping 1/4" from corners:


(Remember the photo of the loop from above? Here it is again. Just sew the binding right over the raw end of the loop, being careful not to catch the folded end of the loop in your binding.)


Continue sewing binding all the around the potholder. When you come back to the first side, trim the binding so that it fits inside the folded starting end of the binding. Sew along edge to finish binding.


Fold the binding to the back of the potholder and pin in place. Machine stitch "in the ditch" along the seam. (You can also hand stitch the binding on the back, but machine stitching will hold up better to repeated washings. It's also faster- and we like that.)


Ta-da! Potholder completed. Now go make 100 more. Christmas is coming......

LinkWithin

Related Posts with Thumbnails