


For the month of December, we will be doing a tutorial for an ornament every week. This week's ornament is a patchwork bird. It's an excellent way to make use of your scraps! If you have bags full of tiny pieces that you've been saving for someday- today is your day!
If you are short on time, there is also a plain version- you can sew up a "flock" of these in an afternoon.... You could also add lavender or a few drops of scented oil to your stuffing to make sachets. I've done "modern Christmas" colors of bright green, fuchsia and turquoise- you can use whatever fabric scraps you have lying around (I know you've got some fabric there, somewhere... ha ha)
Supplies:
- Scraps of fabric
- Polyester filling/stuffing
- 1/8" ribbon
- Embroidery floss
- For the eye: a tiny button, seed bead, or thread (such as embroidery thread or wool thread) to make a French knot
Print out and cut out pattern pieces (link at bottom of post).
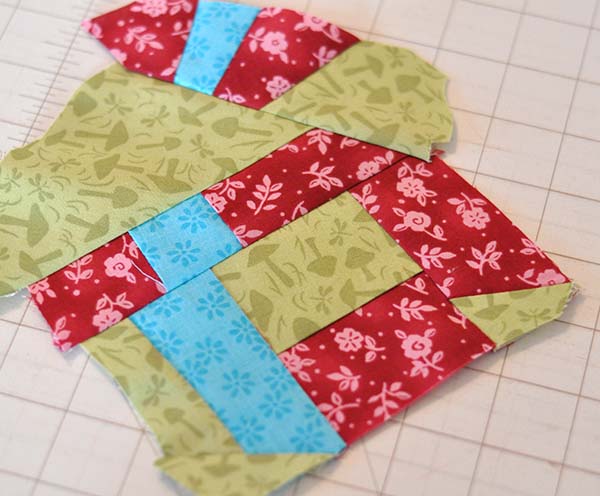
To make the patchwork version, piece together scraps of
fabric until you get a piece about 5 x 9” big.
For the bird's body: For the patchwork version, place you patchwork piece right sides together with a plain piece of fabric. For the plain bird, place 2 pieces of fabric right sides
together, pin pattern to fabric. Cut out around pattern. Remove pattern piece.
Pin fabric pieces together.
Sew the pieces together (still right sides together) with a
1/4" seam allowance, leaving an opening as indicated on pattern piece.
Backstitch at beginning and ending of stitching.

Hint for sewing around curves- shorten your stitch length,
and as you go around the curves, go slowly and stop every few stitches to lift
the foot just slightly and pivot the fabric slightly.
Clip seam allowance at points of tail and beak. Make a few
small notches at the curves. This will eliminate some "bulk" of the fabric and make your seams flatter when you turn it right side out.

Turn bird right side out. You can use tweezers to help pull
tight areas right side out. Use a wooden skewer to gently push out the points
of tail and beak. Press (press the raw edges of the opening in.)


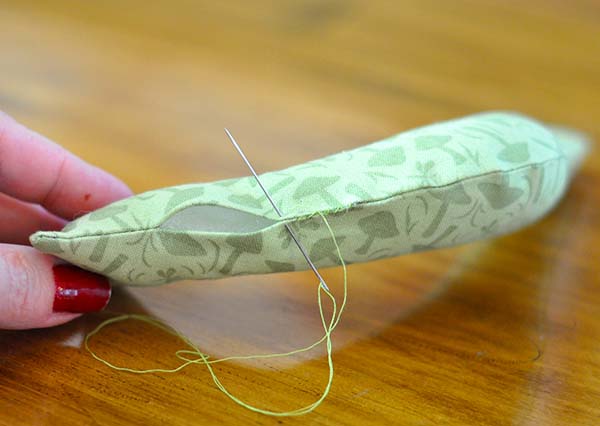
Loosely stuff bird with polyester filling. Use a wooden
skewer to push filling into head and tail. Hint: stuff bird with many small
pieces of filling, instead of a few large pieces.
Hand stitch opening closed with matching thread.
For wing, place 2 pieces of fabric right sides together, pin
pattern to fabric and cut out. Remove pattern piece. Sew together (do not leave
an opening.) Trim seam allowances.

Carefully cut a slit about 1 1/4" long into 1 side of
the wing.
Turn right side out; press. Stitch opening closed and/or put
a few drops of Fray Check on the raw edges.

Use embroidery floss to stitch around edges of wing- you can
do a blanket stitch, whip stitch, or make an X stitch. To make the X stitch,
bring up needle through A, bring it around to the back, then bring it up
through B (to the right of A). Continue making X’s.

Use matching thread to stitch wing to bird (you don’t have
to stitch down the whole wing, just the top.)

For the eye, sew on a tiny button, seed bead, or make a French knot.
Tie a bow around the neck with 1/8" wide ribbon.
Use a sewing needle to attach a 12" piece of embroidery thread to top of bird; knot to form a loop for hanging.
(Here is the link to last week's ornament, Glittered Forest Friends, in case you missed it.)
What colors would you make your birds in? I think this would be a really cute project any time of year, not just during the holidays.
Oh! and don't forget I will be on Pat Sloan's American Patchwork & Quilting Show later today! I am excited, and pretty nervous- I hope I don't say anything stupid, you know??? I mean, it's one thing to say something stupid to the bank teller or the store clerk, but with so many people listening on the interwebs..... it's a bit nerve wracking!


Wonderful tutorial and I love making birds and they look wonderful on Christmas trees.
ReplyDeleteDebbie
This is such a great way to use stray 'proto type' blocks and/or blocks I made too many of for my other quilts, I never know what to do with them! Thanx. L
ReplyDeleteLovely tutorial! Thanks. :)
ReplyDeleteCute cute ornament! Thanks for the tutorial it is definitely a great way to use some of those fabric scraps.
ReplyDeleteOh how lovely and ther is still some time to make them. Thanks for the great tutorial. Hope your show went well and you enjoyed it too.
ReplyDeleteGreat tutorial, thank you!
ReplyDeleteSuper idea - thank you.
ReplyDeleteBeautiful and so Tweet!
ReplyDeleteWhat a darling ornament! Thank you for the tutorial!
ReplyDelete